And Again You Have Nice Transition Between Each Shade
It is expected that even a small video editor will characteristic a prepare of basic video transitions. The challenge is to offering critical effects without becoming swollen and unfocused in telescopic. Kdenlive manages to offering the almost unremarkably required furnishings with all the standard options without sacrificing stability or quality.
Read the other parts in this serial: Part one: Introduction to Kdenlive
Office 2: Advanced editing technique
Part 4: Coior correction
Part five: All nigh audio
Office 6: Workflow and determination
The famous first words of every screenplay are FADE IN, and in a way, that is the almost commonly used upshot of all. The archetype fade would normally be considered a transition only in Kdenlive a "transition" is a visual effect that requires two video regions to office, while an "result" works on a single region. This is an important distinction to carry in mind, since the terms are laden with preconceived interpretation.
Layout Mods
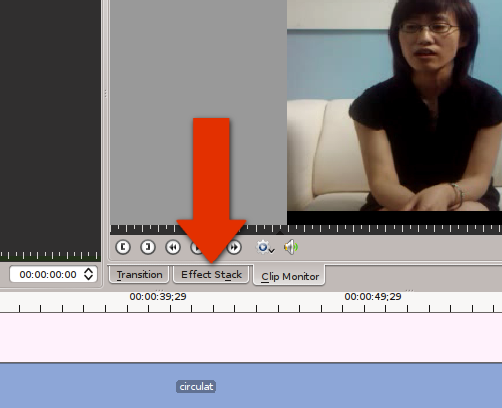
First, configure your layout (covered in the first article of this series) to have the Upshot Stack and Transition console readily accessible. To do this, get to the View menu and select Consequence Stack then Transition.
This introduces 2 new panels into your Kdenlive interface. If your interface at present looks crowded, yous can apply tabs. Since effects and transitions are applied to clips in the Timeline, you'll never use your Prune Monitor (which views clips in the Project Tree) and the Outcome Stack or Transition console (which operate on clips in the Project Monitor / Timeline) at the aforementioned fourth dimension. You lot can brand the Consequence Stack and Transition panel a tab of the clip monitor panel by dragging the effect stack console on to the clip monitor; it is now available in a tabbed view (located at the lesser of the console). Do the same for the Transition console.
Fades
To use a fade effect, right-click on the video region you wish to affect. Select Add Outcome > Fade > Fade to Black, and the fade-to-black transition will exist applied to the end of the clip. Scrub through the video (past clicking along the timelime'due south SMPTE ruler bar) or play (spacebar) to see the issue.
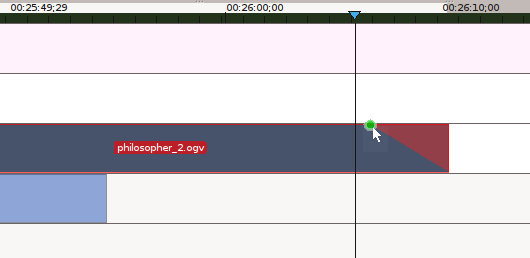
One time you've applied a fade, yous tin change its duration by either using the Duration slider in the Upshot Stack, or you can click and drag the corner of the red fade indicator that appears on the video region.
Note that "Fade In" and "Fade Out" (not "to Blackness") effects are Audio furnishings, not video furnishings. It'southward easy to get them mixed up, and you'll spend an hr wondering why your fades aren't working.
Armed with just these ii simple effects, you virtually likely have all of the functionality expected from a typical video editing application. But for those peculiar clients and users who want more interesting visuals, Kdenlive features quite a fleck more.
Dissolves
A dissolve is similar a fade, except that they do not fade to blackness, but to another prune. This, then is a Transition and requires two clips in order to function.
To use it, place one clip on Video Rail 3 (the bottommost Video Track on the default Kdenlive setup) and another on Video Track 2. Overlap the end Rails ii over the get-go of Track three. The concept hither, as with whatsoever transitional result, is that in lodge to gradually move from 100% of one clip to 100% of another, at that place must be some cloth that overlaps then that the incremental transition can be congenital.
Once you've ensured the clips overlap for some duration, right-click on the region in Runway 2 and select Add Transition > Deliquesce.
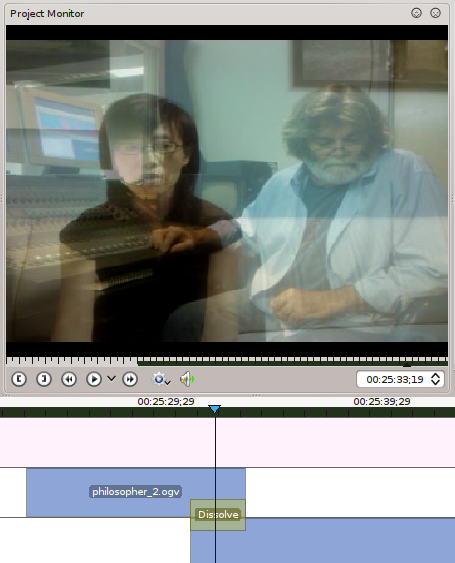
You tin can conform the duration of the dissolve by overlapping the video clips further, and stretching the yellow dissolve region to comprehend more of the overlap.
Slides and wipes
Another way of getting from prune A to clip B is the Slide transition. Beingness a transition, it also must be added to not merely one clip, but to ii clips that overlap.
Place i prune on Video Track 3 and another on Track 2. Make sure they overlap by at least one second. Correct click on the top video clip and select Add Transition > Slide. Play the video to run across the result; observe that one clips "slides" into frame over the other. If you've added the transition in a circular-about mode, yous might discover that the incorrect clip is sliding in; if that happens during your experimentation, select the Slide transition region in the timeline and, click to activate the Transition Tab, and click the Invert checkbox in the Transition options.
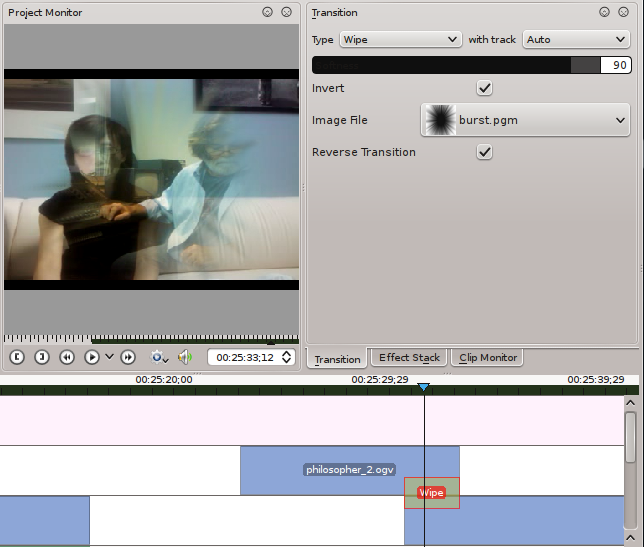
Unlike wipe effects can be seen with the Wipe transition, easily attainable now that you have a transition region past clicking the drop-down carte in the Transition Tab. Choose Wipe to modify the transition, and notice the new options available. You can choose from multiple styles of wipes, and as with the slide you can capsize them to control which prune supplants the other.
Blush Key, aka green screen
With and so many effects and fifty-fifty entire sets existence generated digitally at present, in that location's been a huge need for the "blueish screen" or "green screen" issue, which is technically known simply as a Chroma Key. It is chosen a Chroma Central because you are selecting (or keying) a specific blush (colour) value, which y'all can and then discard entirely or use as a matte, or any number of operations.
The Chroma Key in Kdenlive is a two-step process: outset, y'all must select the colour y'all want to use as your key, and secondly you must composite the image.
The first step tin be done, evidently, with the event called Blue Screen, but it can likewise be washed with the Colour Pick event, which turns out to have more options including choking and throttling the choice.
To set up the effect, place some footage on Video Track iii; information technology could exist anything from a shot of a grassy field to a digital Tron universe that you want your graphic symbol to exist transported to. This is called a plate shot.
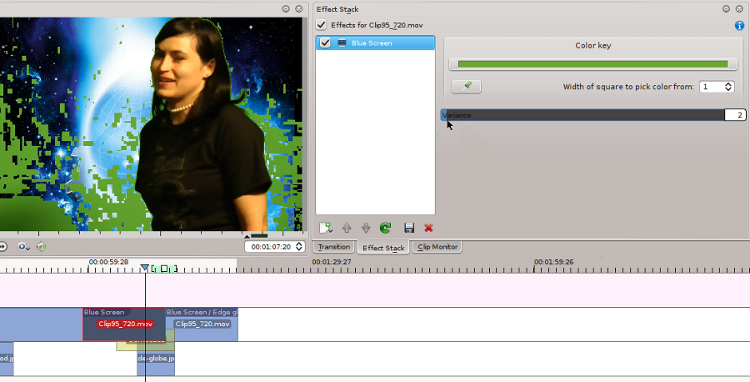
Above this, on Track two, place the shot of your character in front of the green or blueish screen. Right click on this region and select Add Event > Colour Selection.
In the Consequence Stack, utilise the color selector to choose the chroma level y'all wish to cardinal. You can refine the selection with the Hue and Chroma sliders, the Border mode, and other options.
The Bluish Screen effect does exactly what's expected and replaces your selected chroma value with an blastoff channel. If you're using the Colour Selection tool, it will do the reverse of that; information technology retains the colour selected rather than keys it out. Even so, there's a handy check box only under the colour picker for "Invert Selection" which loses the color and retains everything else around information technology. Be sure to check this box if you're using Colour Selection.
The less compressed the source video is, the higher the likelihood of getting a quick and easy blush central, since y'all have more colour depth available for subtle keying. Should you lot need to apply multiple chroma keys or other effects, the Event Stack is called a "stack" for that very reason; effects upon effects tin be added to a single prune as required. If you had to, you wouldn't be the start composite artist to central i shade of blue or green only to add a 2d key for some other shade in that same spectrum, or to primal out all blue in a scene and so add back in some element using a garbage matte.
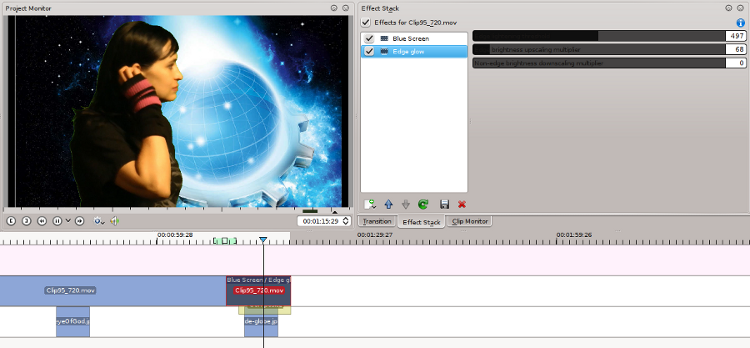
Once you lot've successfully keyed out the color, you've essentially replaced that colour with an blastoff channel that is merely waiting to become transparent. The second footstep, therefore, is to add a composite transition between the peak and bottom video regions. Right click on the top region and select Add Transition > Composite.
The composite transition is added to only the outset 2nd or so of the video region by default, so extend it with your select tool to the duration of the clip. You should encounter in your Projection Monitor that the top video is visible except where there used to be blue or light-green (or whatever colour you lot keyed), through which the plate shot is visible.
At present, ideally, the discipline in the first clip will match the plate's color temperature and will have nice smooth edges and look integrated into the shot. If that is not the case, y'all'll want to either add effects like a Blue Screen effect to central out the last vestigals of a colored edge, or do color correction to better friction match the shots. In the next article, color correction volition be reviewed in detail.
Overall, this is a powerful tool and provided me with surprisingly good results on even highly compressed video I'd shot with an Android phone. This is significant since other editing applications couldn't fifty-fifty ingest that footage, and fifty-fifty after trial-and-error transcoding to merely get the footage into some other editor, the chroma key was poor.
Composited images and titles
If the fabric you are importing for compositing is an prototype or an image sequence, such as an export of sequential png's from Blender or Synfig Studio, then they probably already accept an blastoff channel. In this case, all you need to practise is use the Add Clip choice to add the sequence to your Project Tree.
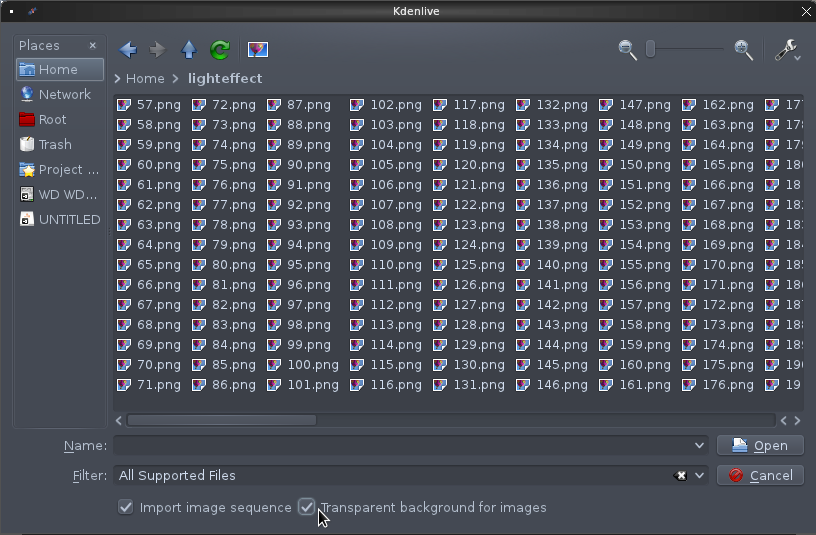
Equally long as you lot have checked the boxes at the bottom of the file chooser dialogue box ("Image Sequence" and "Transparent Groundwork Images") then the images will be imported as a unmarried video clip with congenital-in alpha, meaning no color pick or chroma key is required. Simply place the epitome sequence over a video clip, add the Composite transition, and movement on.
Titling in Kdenlive works much the same way as images or animations. Yous can generate titles from within Kdenlive by right-clicking in your Projection Tree and choosing "Add Championship Prune". This will open a text creation interface, where you'll be able to choose fonts, styles, and even basic animations for the text. You tin can use the text in its default form (white text on a black background) or you tin add a composite transition betwixt the text and some video prune to take a text overlay.
I've never been a fan of doing annihilation but the near bones titling with the congenital-in text tools of a video editor. The editing apps I've used seem to concur with me, since all characteristic or are certain to integrate with external, dedicated titling programs. On complimentary software, there is Synfig Studio, a traditional digital cel animation awarding, and Blender, the famous 3d modelling and blitheness application. There is a Youtube series dedicated to instruction video editors Blender for Motion Graphic Artists available hither: http://youtu.exist/7FBoegkgIho
Determination
Kdenlive features all the standard tools a "prosumer" would ever demand for video product, plus quite a lot more. Its stability and feature fix places it firmly in the professional market, and information technology integrates easily into the workflow of a busy mail service product schedule. With a footling experimentation with the unlike furnishings, Kdenlive volition show itself as a versatile editing application with all the features demanding clients and producers look.
 This work is licensed under a Creative Commons Attribution-Share Alike 3.0 Unported License.
Source: https://opensource.com/life/11/11/effects-and-transitions-kdenlive
0 Response to "And Again You Have Nice Transition Between Each Shade"
Postar um comentário